What is a Blind Corner Wardrobe?
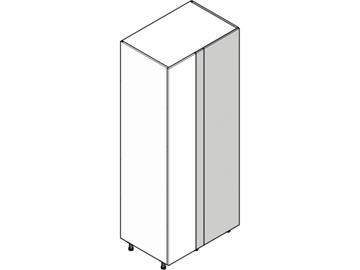
A blind corner unit is similar to a double wardrobe, but only has one door. The other door is replaced by a blanking panel. This enables you to put the unit in the corner, and butt another wardrobe up to it, at a 90 degree angle.
It gives you the ability to use the whole space in your bedroom, as the corners of room are otherwise often wasted.
Units like these are really the key to getting the most out of your bedroom space, so we would definitely encourage you to consider using these.
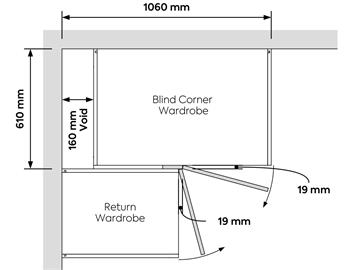
Please note, these don’t go right into the corner of your room. You leave a gap of 160mm between the corner and the unit. This allows the doors of both wardrobes to open without catching on the opposite door.
As with all of bedroom installations, to get the best fit please ensure you plan and prepare. We’ve put some details together below, to help with the installation. Please have a read, or pass on to your bedroom installer, if you’re paying a professional to fit it for you.
Corner Planning
The Blind Corner Wardrobe uses a standard double robe as shown.
The corner hinging panel is made in matching door material, and is also pre-drilled on the inside face for a blind corner hinge. The return wardrobe uses a standard single or double cabinet with standard hinges.
Very little is visible of the corner hinging panel once doors are fitted, depend- ing on the edge profile of the chosen door design.

Installation Instructions
Step 1 – Fit Blanking Panel & Corner Hinging Panel
Fit the chipboard blanking panel to the cabinet top/bottom/end by directly screwing into place (screws not supplied) flush with the cabinet sides - the 100mm Corner Hinging Panel is then similarly fitted into place, creating a 450 mm aperture to one side of the assembly. Note the planning spaces required, by allowing a 160 mm void in the corner. Note – it will be easier to fit the hinge mounting plates to rear face of the corner hin3g0ing0panel at this stage
Step 2 – Form the Return Wardrobe
Use clamp grips to secure the return assembly into position – there should be a consistent 19 mm reveal of the corner hinging panel along it`s full length to allow for the return door. Secure into position via direct screws (not supplied) through the inside face of the blanking panel.